Battery switch on travel trailer function is crucial for managing your RV’s power. This guide breaks down everything you need to know, from understanding different switch types and wiring to troubleshooting problems and ensuring safe operation. We’ll cover connecting and disconnecting batteries, maintenance, and even delve into the different types of batteries used in travel trailers and how they interact with your switch.
Get ready to become a battery switch expert!
Understanding your travel trailer’s battery switch is key to preventing dead batteries and electrical issues. This involves knowing how to safely connect and disconnect your batteries, troubleshoot common problems, and perform basic maintenance. We’ll explore various battery types and their compatibility with different switches, ensuring you’re equipped to handle any power situation on the road.
Understanding Battery Switch Functionality in Travel Trailers: Battery Switch On Travel Trailer Function
Your travel trailer’s battery switch is a crucial component for managing your power supply, allowing you to easily disconnect or connect your house batteries from the trailer’s electrical system. Understanding its function and operation is essential for safe and efficient use of your RV.
A battery switch acts as a central control point, preventing accidental drain on your batteries when the trailer is not in use, protecting sensitive electronics, and providing a way to isolate different battery banks. This ensures the longevity of your batteries and prevents unexpected power failures.
Battery Switch Types
Travel trailers typically utilize different types of battery switches depending on the number of batteries and the level of control desired. A single battery switch is suitable for trailers with a single battery bank, while dual battery switches manage two separate banks (e.g., one for house power and one for starting the vehicle if the trailer is towable). More complex systems might incorporate multiple switches for greater control or the inclusion of solar panels.
The choice depends on the specific electrical needs of your trailer.
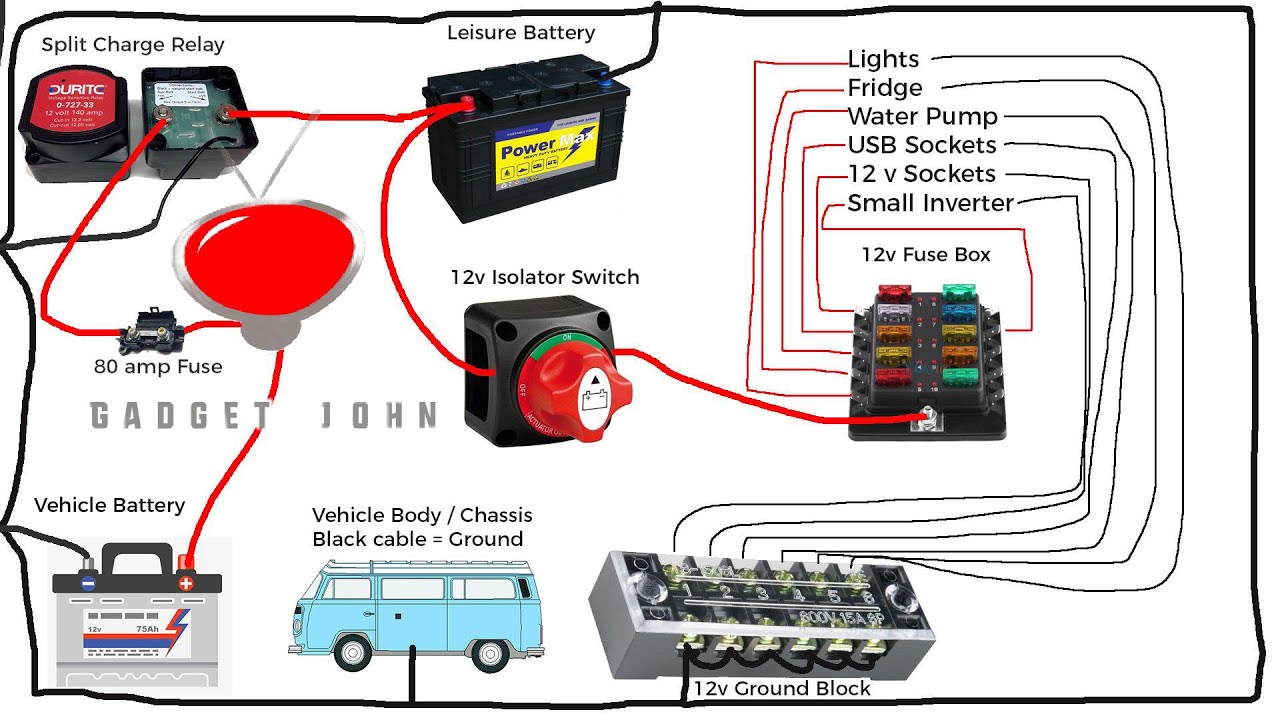
Battery Switch Wiring Configuration
The wiring of a battery switch system is relatively straightforward but should be done correctly for safety. Generally, the positive (+) cables from your batteries connect to the switch’s input terminals. From the switch, the positive cable then continues to the distribution panel or other loads within the trailer. The negative (-) cables typically run directly to the chassis of the trailer or to a common ground point, bypassing the switch for safety reasons.
So, you’re an audiophile who travels? Awesome! Check out this guide on audiophile travel setups for some luxury options if you’re looking for high-end solutions. But if you’re more into practical, budget-friendly tips, then head over to audiophile travel setups for some clever ideas on keeping your music quality high on the go without breaking the bank.
Remember, good sound doesn’t have to be expensive!
Incorrect wiring can lead to electrical shorts or damage to your equipment. A professionally installed system is recommended for those without experience.
Operating a Battery Switch
Proper operation of your battery switch is crucial. Before using the switch, consult your trailer’s manual to ensure you understand the specific layout and operation of your model. Most switches use a rotary dial or lever mechanism with clearly marked positions, typically including “Off,” “Battery 1,” “Battery 2,” and sometimes a “Both” position.
- Off: This position completely disconnects the batteries from the trailer’s electrical system, preventing any drain on the batteries while in storage.
- Battery 1 (or similar): This position connects only the first battery bank to the trailer’s system.
- Battery 2 (or similar): This position connects only the second battery bank to the trailer’s system.
- Both (if applicable): This position connects both battery banks to the trailer’s system, providing maximum power capacity.
Always ensure the switch is in the “Off” position when the trailer is not in use or when performing maintenance on the electrical system. Improper operation can lead to battery drain, damage to equipment, or even electrical hazards.
Connecting and Disconnecting Batteries
Connecting and disconnecting your travel trailer’s batteries correctly is crucial for safety and to prevent damage to your electrical system. This section details the proper procedures for managing your house and chassis batteries, along with essential safety precautions. Understanding these steps will help ensure a smooth and safe RVing experience.
The process of connecting and disconnecting your house battery from the chassis battery typically involves a battery switch. This switch allows you to isolate the house battery from the chassis battery and from the main power source. This isolation is important for various reasons, including maintenance, preventing accidental discharge, and ensuring safe handling.
Connecting the House Battery to the Chassis Battery, Battery switch on travel trailer function
To connect the house battery to the chassis battery, simply turn the battery switch to the “on” or “both” position. This will complete the circuit, allowing power to flow between the two batteries. This is generally done when you’re ready to use your trailer’s 12V systems. Remember to always check your switch’s labeling as the terminology can vary slightly between manufacturers.
Disconnecting the House Battery from the Chassis Battery
To disconnect the house battery, turn the battery switch to the “off” position. This isolates the house battery from the chassis battery, preventing any current flow between them. This is important for maintenance, storage, or when you want to disconnect the house battery to prevent draining the chassis battery.
Isolating the House Battery for Maintenance
Isolating the house battery for maintenance is a key safety precaution. Before performing any maintenance on the house battery, always disconnect it using the battery switch. Turn the switch to the “off” position. This completely isolates the house battery, preventing accidental shorts or shocks.
Safety Precautions When Working with Batteries
Working with batteries requires caution. Always wear safety glasses to protect your eyes from potential splashes of battery acid. Battery acid is corrosive, so wear gloves as well. Ensure adequate ventilation, as batteries can release flammable hydrogen gas. Never short circuit the battery terminals, as this can cause sparks and potentially lead to a fire or explosion.
Finally, if you are unsure about any aspect of battery maintenance, consult a qualified professional.
So, you’re an audiophile who travels? Awesome! Check out this guide on building the perfect audiophile travel setup for those luxurious getaways. It’s all about finding that sweet spot between portability and sound quality. But if luxury isn’t your style and you’re looking for more budget-friendly options, then head over to this other resource on audiophile travel setups for practical tips and tricks to keep your music sounding amazing on the go, no matter your budget.
Comparison of Battery Connection Methods
Different RVs may utilize slightly different methods for connecting batteries. The following table compares some common approaches, highlighting their advantages and disadvantages.
| Connection Method | Advantages | Disadvantages | Typical Use Case |
|---|---|---|---|
| Single Battery Switch | Simple, inexpensive | Limited control, potential for accidental discharge | Smaller travel trailers |
| Dual Battery Switch | Separate control over house and chassis batteries | Slightly more complex | Larger travel trailers, those with high power demands |
| Battery Isolator | Automatic charging of both batteries, prevents parasitic drain | More expensive | Travel trailers with high power demands and solar panels |
| Smart Battery Management System | Sophisticated control, monitoring, and charging optimization | Most expensive | High-end travel trailers, demanding users |
Battery Switch and Electrical System Integration
Your travel trailer’s battery switch isn’t just a simple on/off switch; it’s a crucial component that manages the flow of power between your batteries and the rest of your electrical system. Understanding how it interacts with other parts is key to preventing electrical problems and ensuring reliable power.The battery switch acts as a central control point, determining which power source feeds your trailer’s electrical components.
When engaged, it connects your house batteries to the system, allowing you to power lights, appliances, and other devices. When disengaged, it isolates the batteries, protecting them from discharge and preventing accidental drain when the trailer is not in use. This interaction with other components like the converter and inverter is vital for efficient power management.
Power Distribution Management by the Battery Switch
The battery switch plays a critical role in managing power distribution within your travel trailer. With the switch ON, power from your house batteries flows to the converter, which transforms 12V DC power from the batteries into 120V AC power for household appliances. Simultaneously, the batteries can directly power 12V DC appliances and systems. The inverter, if present, converts the 12V DC power from the batteries into 120V AC power, usually for higher-power appliances.
When the switch is OFF, the house batteries are disconnected from this circuit, preventing drain. This prevents accidental depletion of your batteries when your trailer is parked and not connected to shore power.
Simplified Electrical System Diagram
Imagine a simple diagram. We have three main components: the house batteries (represented by two parallel lines), the converter (a box labeled “Converter”), and a collection of appliances and lights (represented by a lightbulb and a plug). A line represents the wiring. With Battery Switch Engaged: A line connects the batteries to the converter. Another line branches off from the batteries to directly power the 12V DC appliances.
From the converter, lines go to the 120V AC appliances. This shows the flow of power from the batteries through the converter and directly to the 12V DC appliances. With Battery Switch Disengaged: The line connecting the batteries to the converter and 12V DC appliances is broken. Power only flows from shore power (if connected) to the converter and then to the 120V AC appliances.
The batteries are completely isolated from the system. The diagram clearly illustrates the power flow with and without the battery switch engaged.
Impact of a Faulty Battery Switch
A malfunctioning battery switch can have several negative consequences. A switch that remains closed (ON) even when you intend it to be open can drain your batteries, leaving you without power when you need it. Conversely, a switch that’s always open (OFF) will prevent you from using your house batteries to power your trailer’s electrical system. In more severe cases, a faulty switch might create a short circuit, potentially damaging your batteries or other electrical components.
Regular inspection and testing of your battery switch are crucial for reliable operation.
Battery Switch Maintenance and Replacement
Keeping your travel trailer’s battery switch in good working order is crucial for reliable power. Regular maintenance prevents unexpected failures and ensures a smooth power supply to your appliances and systems. Neglecting maintenance can lead to corrosion, malfunction, and even potential safety hazards.Proper maintenance and timely replacement are key to avoiding these problems and extending the life of your battery switch and related components.
This section details a routine maintenance schedule, safe replacement procedures, and tips for extending the lifespan of your battery switch.
Routine Maintenance Schedule
A simple, regular maintenance schedule can significantly extend the life of your battery switch. This includes visual inspections and cleaning to prevent corrosion buildup, which is a common cause of failure.
- Monthly Inspection: Visually inspect the battery switch for any signs of corrosion, loose connections, or damage. Look for any white powdery residue or green discoloration around the terminals – these are signs of corrosion. Also check the wiring for any fraying or damage.
- Quarterly Cleaning: Clean the battery switch terminals and connections with a wire brush and baking soda paste. Apply a corrosion inhibitor (like dielectric grease) to the terminals after cleaning to prevent future corrosion. This prevents buildup and ensures a clean, solid connection.
- Annual Inspection and Tightening: Perform a thorough inspection, checking all connections and tightening any loose bolts or screws. This ensures that all connections remain secure and prevent potential issues.
Safe Replacement of a Faulty Battery Switch
Replacing a faulty battery switch is a relatively straightforward process, but safety is paramount. Always disconnect the battery’s negative terminal before working on any electrical components. This prevents accidental short circuits and potential injury.
- Disconnect the Battery: Disconnect the negative (-) terminal of your battery using a wrench. This is the most crucial step to ensure your safety during the replacement process.
- Remove the Old Switch: Carefully remove the old battery switch, noting the wiring configuration before disconnecting any wires. Take pictures if needed to help with reinstallation. Use the appropriate tools (screwdrivers or wrenches) to loosen and remove the mounting hardware.
- Install the New Switch: Install the new battery switch, ensuring the wiring is connected correctly according to the previous configuration (or the new switch’s instructions). Double-check all connections before proceeding.
- Reconnect the Battery: Reconnect the negative (-) terminal to the battery. After reconnection, test the switch to ensure it functions correctly. Turn the switch to different positions to check the power flow.
Tips for Extending Battery Switch Lifespan
Several practices can significantly extend the lifespan of your battery switch. These include preventing corrosion, ensuring proper connections, and using high-quality components.
- Prevent Corrosion: Regularly clean and apply a corrosion inhibitor to the terminals. Corrosion is the biggest enemy of battery switches.
- Maintain Tight Connections: Ensure all connections are tight and secure. Loose connections can lead to overheating and damage.
- Use High-Quality Components: Invest in a high-quality battery switch and use appropriate-gauge wiring for your system. This ensures durability and reliability.
- Proper Ventilation: Ensure adequate ventilation around the battery and switch to prevent excessive heat buildup. Heat accelerates corrosion and reduces component lifespan.
Tools and Materials Needed for Battery Switch Replacement
Having the right tools makes the replacement process smoother and safer.
- Wrench (appropriate size for battery terminals)
- Screwdrivers (Phillips and flathead, as needed)
- Wire brush
- Baking soda
- Dielectric grease
- New battery switch (matching your current setup)
- Replacement wiring (if necessary)
- Electrical tape (if necessary)
Battery Switch and Safety
Working with your travel trailer’s battery system requires caution. Improper handling can lead to serious injury or damage to your equipment. Understanding the potential hazards and following safety guidelines is crucial for a safe and enjoyable RV experience.Improper use of a battery switch can result in several safety risks. For example, accidentally leaving the switch in the “off” position while running appliances could drain your house batteries, leaving you without power.
Conversely, leaving the switch in the “on” position while disconnected from shore power could lead to a complete discharge of your batteries, potentially damaging them. Additionally, incorrect wiring or connections can cause short circuits, resulting in sparks, fires, or even explosions.
Potential Risks Associated with Battery Switch System Work
Working on any electrical system, especially one involving high-amperage batteries, presents several risks. These include electrical shocks, burns from arcing, and explosions from hydrogen gas buildup. Battery acid is also corrosive and can cause serious skin and eye damage. The potential for injury is amplified when working in confined spaces or poor lighting conditions common in travel trailers.
Even seemingly minor tasks, such as tightening a connection, require careful attention to safety protocols.
Safety Guidelines for Working with Batteries and Electrical Systems
Before starting any work on your battery switch or related systems, always disconnect the negative (-) terminal of your battery. This will prevent accidental short circuits. Ensure the area is well-ventilated to dissipate any hydrogen gas that may have accumulated. Always use insulated tools to avoid electrical shock. Never wear loose clothing or jewelry that could come into contact with electrical components.
When working in confined spaces, ensure adequate ventilation and consider using a respirator to prevent inhalation of battery fumes. If unsure about any aspect of the work, consult a qualified RV technician.
Appropriate Use of Personal Protective Equipment (PPE)
Personal Protective Equipment (PPE) is essential when working with batteries and electrical systems. This includes safety glasses or a face shield to protect your eyes from splashes of battery acid or sparks. Rubber gloves are crucial to protect your hands from corrosive battery acid and electrical shock. Consider using insulated gloves specifically designed for electrical work. Closed-toe shoes are necessary to protect your feet from dropped tools or accidental spills.
For extended work or in poorly ventilated areas, a respirator should be used to filter out harmful fumes. Appropriate PPE minimizes the risk of injury and protects your health.
Types of Batteries Used in Travel Trailers

Choosing the right battery for your travel trailer is crucial for reliable power. Different battery types offer varying performance characteristics, impacting everything from your ability to run appliances to the lifespan of your battery bank. Understanding these differences will help you make an informed decision.
Two primary battery types dominate the travel trailer market: lead-acid and lithium. Each has its own strengths and weaknesses, and the best choice depends on your specific needs and budget.
Lead-Acid Batteries
Lead-acid batteries are the traditional choice for RVs and travel trailers due to their relatively low cost and wide availability. However, they have some significant drawbacks compared to newer lithium-ion technologies. There are two main types of lead-acid batteries: flooded and absorbed glass mat (AGM). Flooded lead-acid batteries require regular maintenance, including checking the electrolyte level and adding distilled water.
AGM batteries are sealed and maintenance-free, making them a more convenient option.
Lithium Batteries
Lithium-ion batteries are rapidly gaining popularity in the RV world. They offer several advantages over lead-acid, including significantly longer lifespan, higher energy density (meaning more power for the same weight), and faster charging times. However, lithium batteries are typically more expensive upfront. Different chemistries exist within lithium-ion batteries (like LiFePO4), each with slightly different characteristics.
Comparison of Lead-Acid and Lithium Batteries
The following table summarizes the key differences between lead-acid and lithium batteries in the context of a travel trailer’s battery switch system. The impact on the switch itself is primarily related to the battery’s voltage and the switch’s compatibility.
| Feature | Lead-Acid (Flooded & AGM) | Lithium (LiFePO4 example) |
|---|---|---|
| Initial Cost | Lower | Higher |
| Lifespan | 3-5 years | 8-10+ years |
| Maintenance | Flooded: Requires maintenance; AGM: Maintenance-free | Maintenance-free |
| Energy Density | Lower | Higher |
| Charging Time | Slower | Faster |
| Weight | Heavier | Lighter |
| Voltage (Common) | 12V | 12V |
| Typical Capacity (Ah) | 100-200 | 100-300+ |
Battery Switch Considerations
Most battery switches are designed to handle 12V lead-acid batteries. While many will also work with 12V lithium batteries, it’s crucial to check the manufacturer’s specifications to ensure compatibility. Some lithium batteries require specific charging profiles that a standard battery switch may not support. In such cases, you might need a more sophisticated charging system that manages the lithium battery’s charging process independently.
Specifications of Common Travel Trailer Batteries
The following table provides typical specifications for common travel trailer batteries. Note that these are approximate values, and actual specifications can vary depending on the manufacturer and model.
| Battery Type | Voltage (V) | Capacity (Ah) | Weight (approx. lbs) |
|---|---|---|---|
| Group 24 Lead-Acid (Flooded) | 12 | 75-100 | 50-60 |
| Group 27 Lead-Acid (AGM) | 12 | 100-120 | 60-70 |
| Group 31 Lead-Acid (AGM) | 12 | 150-200 | 80-90 |
| 100Ah Lithium (LiFePO4) | 12 | 100 | 30-40 |
Mastering your travel trailer’s battery switch empowers you to confidently manage your RV’s power system. By understanding its function, performing routine maintenance, and knowing how to troubleshoot common issues, you’ll enjoy worry-free adventures. Remember safety is paramount; always disconnect power before working on any electrical components. Happy travels!
Commonly Asked Questions
What happens if my battery switch is faulty?
A faulty switch can lead to power loss, dead batteries, or even damage to other electrical components. It’s crucial to address any issues promptly.
How often should I check my battery switch?
Regularly inspect your switch for corrosion, loose connections, and proper operation. A visual check every few months is a good practice.
Can I use any type of battery with my battery switch?
Not necessarily. Check your switch’s specifications and your RV’s manual to ensure compatibility with the battery type and voltage.
What tools do I need to replace a battery switch?
You’ll likely need screwdrivers (Phillips and flathead), wire cutters/strippers, and possibly a multimeter for testing.
